


Overview
Minikube is a micro version of Kubernetes that can be used for testing or development purposes in your local environment(Windows, Linux, macOS). it is a one-node Kubernetes cluster that runs on a particular virtualization software that you specify, which could be VirtualBox, HyperV, KVM, etc.
Objective
For this exercise, we will be deploying a simple mongo express web app that connects to a MongoDB database
Prerequisites
In other to achieve the above, we will need the following;
- Minikube
- kubectl
- virtual box
- terminal (Git bash or Powershell)
- 2gb ram
- 20gb disk space
Setting up the environment
To install minikube on Windows you can run the following command on your Powershell terminal;
New-Item -Path 'c:\' -Name 'minikube' -ItemType Directory -Force
Invoke-WebRequest -OutFile 'c:\minikube\minikube.exe' -Uri 'https://github.com/kubernetes/minikube/releases/latest/download/minikube-windows-amd64.exe' -UseBasicParsing
then make sure you add the binary to your PATH with the following command;
$oldPath = [Environment]::GetEnvironmentVariable('Path', [EnvironmentVariableTarget]::Machine)
if ($oldPath.Split(';') -inotcontains 'C:\minikube'){ `
  [Environment]::SetEnvironmentVariable('Path', $('{0};C:\minikube' -f $oldPath), [EnvironmentVariableTarget]::Machine) `
}
you will need to restart your powershell prompt before proceeding. Alternatively, you can just download the minikube installer for Windows here.
For Linux machines, you can download minikube with the following commands;
curl -LO https://storage.googleapis.com/minikube/releases/latest/minikube-linux-amd64
sudo install minikube-linux-amd64 /usr/local/bin/minikube
For MacOS, minikube can be downloaded with;
curl -LO https://storage.googleapis.com/minikube/releases/latest/minikube-darwin-amd64
sudo install minikube-darwin-amd64 /usr/local/bin/minikube
Kubectl is a utility tool that helps you interact with and manage resources inside kubernetes clusters. Most times kubectl is installed alongside minikube during minikube installation, but if that is not the case and you need to install kubectl, you can follow the detailed guide here.
Detailed instructions on downloading virtualbox for your prefered OS can be found here.
Now that all the tools we need are installed and ready, you can confirm them by running;
kubectl version
minikube version
This should return the following outputs;
PS C:\Users\joxhb\Desktop\minikube> minikube version
minikube version: v1.23.2
commit: 0a0ad764652082477c00d51d2475284b5d39ceed
PS C:\Users\joxhb\Desktop\minikube> kubectl version
Client Version: version.Info{Major:"1", Minor:"20+", GitVersion:"v1.20.8-dispatcher", GitCommit:"283881f025da4f5b3cefb6cd4c35f2ee4c2a79b8", GitTreeState:"clean", BuildDate:"2021-09-14T05:16:08Z", GoVersion:"go1.15.13", Compiler:"gc", Platform:"windows/amd64"}
Create a directory called "minikube" and move into that folder ;
mkdir minikube
cd minikube
This is where all our files will reside. Now clone the Github repository containing the files;
git clone https://github.com/Joshua-Igoni/minikubeXmongo.git
After cloning you will have the following files as shown below
PS C:\Users\joxhb\Desktop\kubernetes\minikube> ls


    Directory: C:\Users\joxhb\Desktop\kubernetes\minikube


Mode                 LastWriteTime         Length Name
----                 -------------         ------ ----
-a----        11/13/2021   5:45 PM            106 configmap.yaml
-a----        11/13/2021   5:45 PM            876 mongo.yaml
-a----        11/13/2021   5:45 PM           1127 mongoexpress.yaml
-a----        11/13/2021   5:45 PM            159 secret.yaml
Explaining some k8s concepts
Kubernetes follows an object model style of operation which means that each thing that Kubernetes manages is represented by an object, and you can view and change these object attributes and state, examples of objects are pods, deployments, stateful sets, jobs, and cron jobs, services, volumes, etc. But for this exercise, we will be using pods, deployments, services, config maps, and secrets specifically. Pods are the smallest deployable objects in Kubernetes, it is the environment where a container image will exist and share networking and storage space. Deployments ensure that a defined set of pods is running at any given time. Services ensure communication between pods in a cluster and also to external endpoints outside the cluster depending on if it's an internal or external service. Configmaps help store configuration data, while secrets help store sensitive data such as passwords and usernames, etc.
There are basically two ways by which you can modify or manage the state of a cluster;
- Declarative management
- Imperative management
Declarative management (which we will be using) is the form of management where the desired state of the cluster that you want is being properly documented in manifest files (.yaml) and once executed, Kubernetes will work to bring that state into being. In other words, you do not have to worry about the "how" the described state comes about. However, in the Imperative management style, you have to tell Kubernetes exactly how it is supposed to bring that desired state into being through a series of commands.
Understanding the structure of manifest files
From our initial steps we have already cloned our manifest files from the GitHub repo, now let's understand how that really works.
mongo.yaml;
apiVersion: apps/v1
kind: Deployment
metadata:
  name: mongodb-deployment
  labels:
    app: mongodb
spec:
  replicas: 1
  selector:
    matchLabels:
      app: mongodb
  template:
    metadata:
      labels:
        app: mongodb
    spec:
      containers:
      - name: mongodb
        image: mongo
        ports:
        - containerPort: 27017
        env:
          - name: MONGO_INITDB_ROOT_USERNAME
            valueFrom:
              secretKeyRef:
                 name: mondb-secret
                 key: mongo-root-username
          - name: MONGO_INITDB_ROOT_PASSWORD
            valueFrom:
              secretKeyRef:
                 name: mondb-secret
                 key: mongo-root-password

---
apiVersion: v1
kind: Service
metadata:
  name: mongodb-service
spec:
  selector:
    app: mongodb
  ports:
  - protocol: TCP
    port: 27017
    targetPort: 27017
From the file above, "apiVersion" describes which Kubernetes apiVersion is used to create the object. "kind" Defines the object you want to be created. "metadata" helps identify the Object, using names, unique id, namespace and labels. "Spec" provides more configuration details depending on the kind of object being created, "Template"" holds information on the container image to be pulled, ports to listen on, environment variables drawn from secrets and configmaps etc.
For this particular manifest file (mongo.yaml), Kubernetes will create a deployment object that will maintain the state of a single pod, which will pull the MongoDB image and listen on port 27017 while making reference to the username and password that has been stored in another Kubernetes object called a secret. It will also create an internal service (ClusterIP) that will aid in the communication between this MongoDB pod and the mongo express pod.
Mongoexpress.yaml;
apiVersion: apps/v1
kind: Deployment
metadata:
  name: mongo-express
  labels:
    app: mongo-express
spec:
  selector:
    matchLabels:
      app: mongo-express
  template:
    metadata:
      labels:
        app: mongo-express
    spec:
      containers:
      - name: mongo-express
        image: mongo-express
        ports:
        - containerPort: 8081
        env:
          - name: ME_CONFIG_MONGODB_ADMINUSERNAME
            valueFrom:
              secretKeyRef:
                name: mongodb-secret
                key: mongo-root-username
          - name: ME_CONFIG_MONGODB_ADMINPASSWORD
            valueFrom:
              secretKeyRef:
                name: mongodb-secret
                key: mongo-root-password
          - name: ME_CONFIG_MONGODB_SERVER
            valueFrom:
              configMapKeyRef:
                name: mongodb-configmap
                key: database_url

---
apiVersion: v1
Kind: Service
metadata:
  name: mongoexpress-service
spec:
  selector:
    app: mongo-express
  type: LoadBalancer
  ports:
    - protocol: TCP
      port: 8081
      targetPort: 8081
      nodePort: 30000
This also follows the same structure explained earlier for the mongo.yaml file except that it pulls the mongo-express image and listens on port 8081, makes reference to the username and password in the Kubernetes secret object for authentication into the database, and also makes reference to the config map object that helps it identify the MongoDB pod inside the cluster through the internal service. In this file, an external service(Loadbalancer) is created to enable or facilitate incoming external connections to the pod.
Secret.yaml;
apiVersion: v1
kind: Secret
metadata:
  name: mondb-secret
type: Opaque
data:
  mongo-root-username: <your username>
  mongo-root-password: <your password>
In this file, Kubernetes creates an object of type "secret" which stores sensitive information such as username and password for the database.
configmap.yaml;
apiVersion: v1
kind: ConfigMap
metadata:
  name: mongodb-configmap
data:
  database_url: mongodb-service
The configmap file holds configuation data that helps the mongo express app connect to the mongdb pod.
Architectural representation
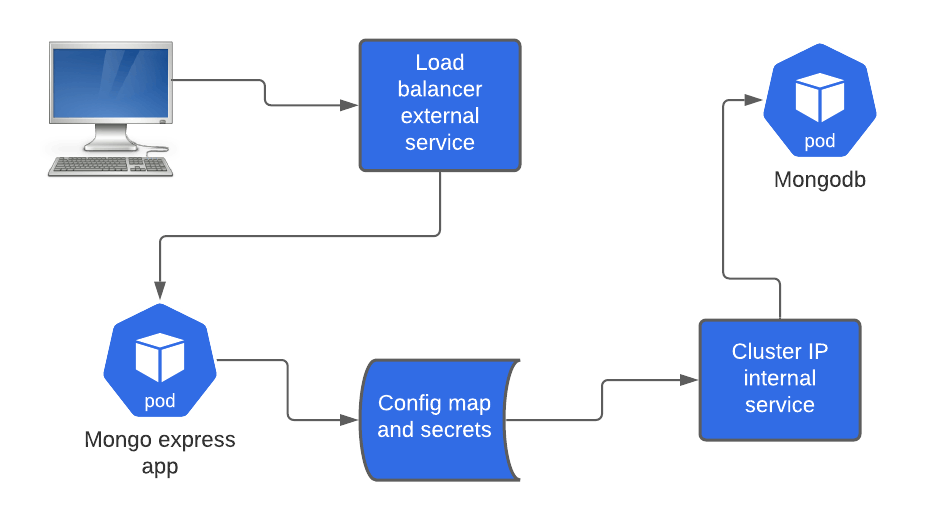
The above diagram describes the workflow of the client connection to the database through the services. The client computer makes a connection to the load balancer on port 8081, then through a node port on port 30000 then to the mongo express app on listening on port 8081. The mongo express app, through the config map and secrets, makes a connection to the internal service (clusterIP) on port 27017 which forwards the connection to the database on port 27017.
Starting the cluster and applying templates
Now that we understand the workflow and the syntax involved in the entire process, lets move on to create the minikube cluster and apply our template files.
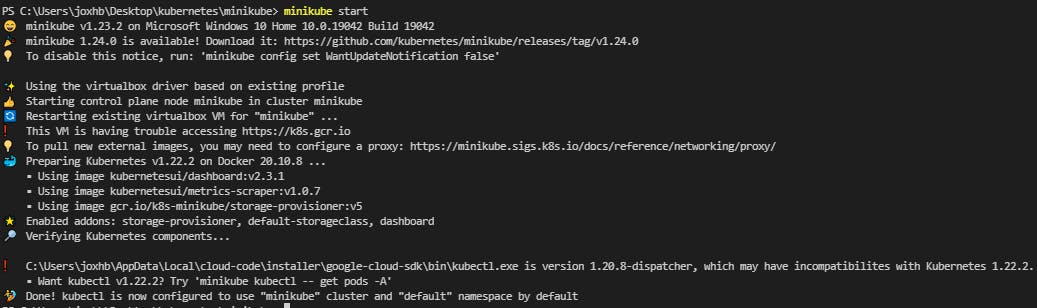
You can start the minikube cluster with the following command;
minikube start
You should be getting the following output;
Now run the following commands to create our desired state;
kubectl apply -f secret.yaml
kubectl apply -f configmap.yaml
kubectl apply -f mongo.yaml
kubectl apply -f mongoexpress.yaml
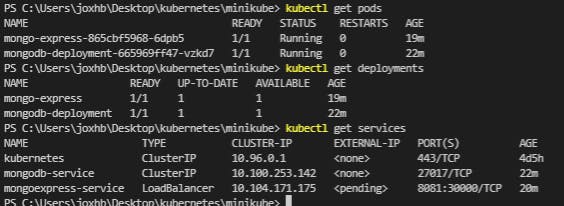
To check if the pods, deployments, and services are active, run the following commands;
kubectl get pods
kubectl get deployments
kubectl get services
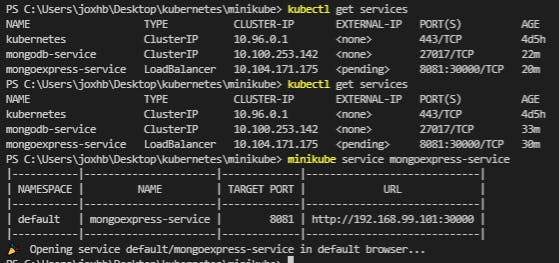
you should be having something similar to what i have below;
Now run the following command to get the external IP address of the loadbalancer service we created earlier;
minikube service mongoexpress-service
an IP would be automatically generated, you can use that to access your application.
here is a screenshot of the application below;
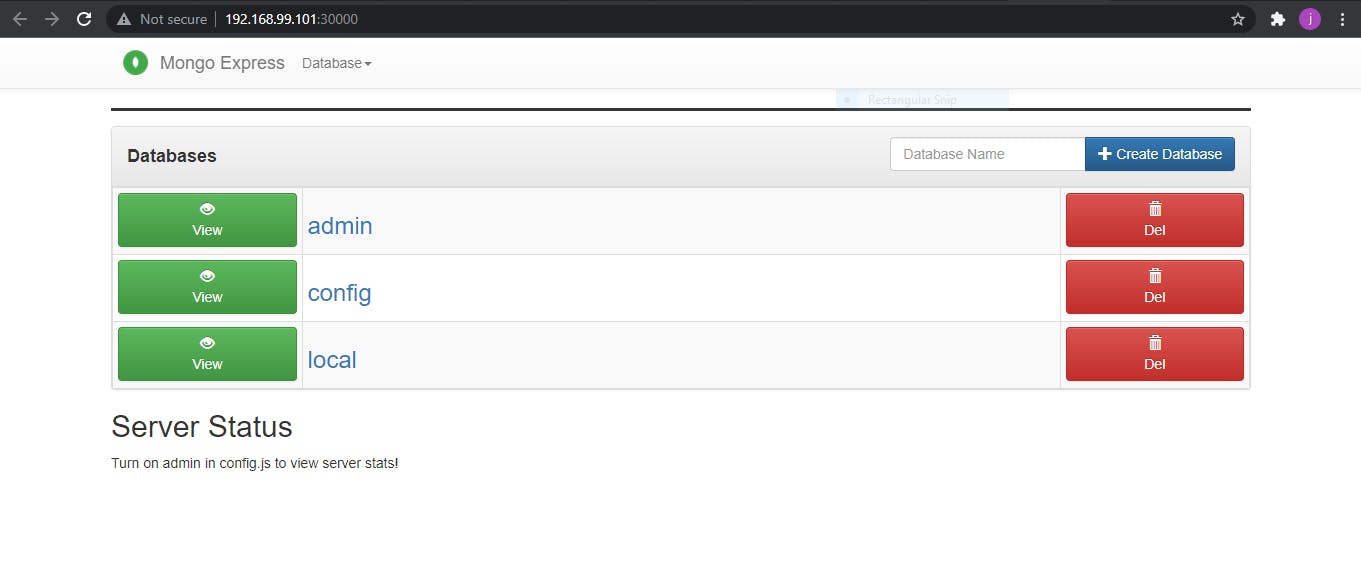
congratulations!!!, you just successfully set up a web app and database using minikube.
Conclusion
Minikube will serve well for testing, learning, and development purposes. So if you are a beginner, this is a great place to start and when you are comfortable you can graduate to bigger k8s systems, deploying bigger applications as your skills mature. There are other easy ways of setting up a cluster and they include managed cloud services such as EKS, GKE, AKS etc. You can also leverage that for more powerfull nodes to host compute or data intensive applications.
Thanks for reading and practicing, feel free to like and share.